

I will say that for my breed of choice (American Saddlebred), I like to post the trot. This rider is not posting, but you can see that she still makes it look so elegant!
Showing posts with label Instructions. Show all posts
Showing posts with label Instructions. Show all posts
Wednesday, August 21, 2013
Are You New to Riding Aside?
You may enjoy this video from the Danish Sidesaddle Association. The close up views of the riders hands, good body position and other details may help you! I really enjoyed this:
I will say that for my breed of choice (American Saddlebred), I like to post the trot. This rider is not posting, but you can see that she still makes it look so elegant!
I will say that for my breed of choice (American Saddlebred), I like to post the trot. This rider is not posting, but you can see that she still makes it look so elegant!
Thursday, March 28, 2013
From a Discussion Yesterday...
..on the Sidesaddle group in Facebook. The ladies were discussing the pictures just below showing the same rider on different horses where the sidesaddle is positioned in very different places.While the picture on the left does look really far back at first glance, I challenge you to look again.
As I said earlier, these are 2 different horses. Instead of looking at how much distance there is from the horses head to the rider, look now at the distance from the horses tail to the rider and you will see just low long the horse on the left is and that the rider is in acceptable riding positions in both pictures.


Now that you have read the above information... look at the antique photo once again.

Wednesday, May 18, 2011
Exercise to Ride Aside
One of my very first sidesaddle pals, Pam sent me this a long time ago and I think you will enjoy it as much as I did!
Please Note - The majority of these exercises are to be performed SLOWLY. Never bounce or pulse to extend a stretch. If you have chronic joint pain, discuss exercises with your doctor before attempting.
UNMOUNTED EXERCISES
Hip and glut stretch
Sit on a straight chair, feet flat on the floor. Cross right leg over the left leg. Rest the outside of your right calf on top of your left thigh. Grasp right ankle with left hand. GENTLY pull right ankle toward left hip. At the same time, press right knee downward toward floor. Keep stretch steady and smooth, do not bounce or pulse. Only stretch until you feel discomfort. Do not stretch until your discomfort turns to pain. Hold stretch for a slow count of 5. SLOWLY release right ankle, uncross legs and set right foot back on floor.
Lift right foot off floor and swing knee to the right as far as it will go comfortably. Pause. Swing leg back to starting point. Set foot back on the floor. Extend right leg straight in front of you and hold for a count of 3. Repeat this stretch and release 5 or 6 times, once or twice a day.
Knee and ankle strength and stretch
Standing up straight, lift left foot off floor however is most comfortable for you. Bend right leg at the knee, SLOWLY lower yourself as far as you can without lifting right heel off of floor. DO NOT BOUNCE. Hold for a slow count of 5. SLOWLY rise up until leg is again straight.
Now stand on left foot and raise right foot off floor. SLOWLY bend and straighten your right knee several times. DO NOT KICK. Next rotate right ankle in a circular motion, first one way then the other. Return foot to floor. Repeat this stretch and release 5 or 6 times, once or twice a day.
Thigh strengthener
Standing up straight, SLOWLY lift right leg ahead of you as high as you are able. Hold leg extended for a slow count of 5. Be sure to concentrate on using your thigh to hold up leg, not your back. SLOWLY lower leg, then bend and straighten knee several times. DO NOT KICK. Repeat this exercise 5 or 6 times, once or twice a day.
Calf stretch
On a step or stair, stand on balls of feet with heels extending over edge.
SLOWLY lower your heels until you feel discomfort. DO NOT BOUNCE. Hold for a slow count of 5. Rise back up to level. Pause. SLOWLY rise up to tip toe. Hold for slow count of 5. SLOWLY lower heels down past level until you feel discomfort. Hold for slow count of 5. Step down. Repeat this stretch and release 5 or 6 times, once or twice a day.
Foot coordination
Sitting in a chair, hands on each side of hips to support weight. Raise feet slightly off of floor and ahead of you. Point right toes down and left toes up. Return feet to being even with each other. Repeat rapidly 15 times once or twice a day. Note this is a coordination exercise, not a stretching exercise. Do not strain ankles. It is important to have feet completely off of floor. Do not rest heels on floor. DO NOT increase repetitions of this exercise as it will put undo strain on your lower back.
Thigh balance
Sit on corner edge of table or desk on right thigh and seat. Hang right lower leg and foot over table or desk edge in front of you. Support your weight with left foot on floor. Shift weight to right thigh while raising left foot off floor. Concentrate on weight being centered on thigh rather than seat. Sit up straight, do not lean forward or sideways. Hold for a slow count of twenty. This is a balance exercise, there should be no straining. If you feel as though you need to lean far to the right to lift foot off floor, scoot your seat over to the right about an inch. Try again. Continue to scoot over an inch at a time until you are just barely balancing on edge of the table. Hold balance for a slow count of 20. If you start to teeter hold for a shorter count and work your way up to 20.
MOUNTED EXERCISES
Foot coordination
While warming up your horse at the walk with feet in stirrups, raise right heel up and drop left heel down. Remain evenly balanced in saddle. Try doing this quickly. Right heel up, at the same time, left down. Some riders are able to do this easily. Others have a hard time having their feet go in different directions.
When you are ready to move into the trot, again raise right heal and drop the left heel. Ease into a sitting trot using your seat for balance, not the stirrups. Only rest feet lightly in stirrups. Then try doing it quickly as you
did at the walk. I wouldn’t suggest posting this way, your horse may never forgive me.
The reason for this exercise is to be able to use light purchase while riding aside. You will occasionally need just a little more security than your balance alone. As you will learn in a future segment, purchase means to stabilize yourself in the sidesaddle. A light purchase is achieved by pointing your right toe down. What many riders do is also raise their left heel at the same time. This foot coordination exercise and the unmounted one (no. 5) helps to teach you to work your feet independently.
Balance exercise
Ride bareback! Balance yourself with your seat, not your horse’s mouth via the reins. Again, practice right toes down, left heel down. Keep ankles soft, don’t tighten legs. If you’re concerned your horse has too rough of a trot and/or canter, just walk. It will still do you a world of good.
Move back
If you do not ride saddleseat borrow a Lane Fox tree cutback saddle. It’s best to use a flat seat rather than the deeper equitation seat. Typically a flat seat will have a square cantle while an equitation seat will have a round cantle. Riding in a cutback will give you some of the sense of sitting farther back on the horse as you will be riding sidesaddle. You will also be able to practice riding with the longer reins required for sidesaddle. When sitting farther back you will have to have longer reins in order not to have your arms stretched out in front of you.
There are no built in “tricks” to hold you in place on a cutback. The flat seat is designed to allow the rider to shift forward or backward on the seat while executing the various gaits. Staying in one spot, which is what you are aiming for, can be a challenge. Built without knee blocks or deep seats as hunt or dressage saddles are, while riding these saddles it is completely up to the rider to maintain their balance.
Practice the correct saddleseat leg. Ride with feet pointing more forward than in hunt seat. DO NOT turn toes in, instead rotate heels out. This will engage your entire leg into the saddle from the calf all the way to the hip.
New Cues
Practice cueing your horse with only your left leg and your seat. This will give you and your horse a head start before the new saddle and riding position begin.
If your horse does not understand only one leg, use a sidesaddle cane to replace your right leg. Use your cane in the same position and with the same pressure as you would your leg. Some horses pick up weight shift cues, others rely on the cane, while some work better using both. Each horse is different. Experiment to see what works best for your horse. Combining the new cues with the cutback saddle and longer reins, along with the exercises you and your horse will be well on your way to riding aside.
The one exercise that I believe helped me the most was the Thigh Balance!
Thanks again Pam!!!
Monday, April 25, 2011
Gloves...
Before we talk about gloves, I wanted to share something with you about the riding habit Cindy made for me. She created this beauty off of a photograph I sent her. I am not an experienced seamstress, so the thought of tackling an antique pattern was not a good idea!! Cindy, however has made so many of these reproductions, she can create one in only a few days if her schedule allows! While we were e-mailing, I forgot to tell her that I rode specifically against other English riders. While the riding suit itself was beautiful, the fabric lent itself to a more Western style.
I wrote to Cindy and explained everything to her and she so graciously decided to make me another habit. This next one is being made out of worsted wool, the kind of fine wool men's suits are made from.

I HIGHLY recommend Cindy from Wildhorse Fashion. She is talented, nice, very reasonably priced for such difficult work and she is wonderful to work with! Please see her web site on my sidebar of favorite Internet stores!
Now - with this new grey suit.. I needed to find some gloves. It is not proper for a lady to ever wear black gloves riding ~ with the only exception being if she is in mourning. I thought it would be easy to find moderately priced grey gloves.. I was wrong!
This size chart helped me .. as my hands are rather large for a lady.
I found these beautiful kid leather gloves on E-bay for a steel of $15.00. They are a tad bit shorter than I would have liked.. but would rather have these beauties than the $50.00 to $75.00 grey riding gloves I eventually found at another retail store!
Now - lets see if I can find some crochet gloves that I can dye grey!!!
I will post pictures of the new suit Cindy is creating for me as soon as she is done with it. I can't wait!!!
I wrote to Cindy and explained everything to her and she so graciously decided to make me another habit. This next one is being made out of worsted wool, the kind of fine wool men's suits are made from.

I HIGHLY recommend Cindy from Wildhorse Fashion. She is talented, nice, very reasonably priced for such difficult work and she is wonderful to work with! Please see her web site on my sidebar of favorite Internet stores!
Now - with this new grey suit.. I needed to find some gloves. It is not proper for a lady to ever wear black gloves riding ~ with the only exception being if she is in mourning. I thought it would be easy to find moderately priced grey gloves.. I was wrong!
This size chart helped me .. as my hands are rather large for a lady.

I found these beautiful kid leather gloves on E-bay for a steel of $15.00. They are a tad bit shorter than I would have liked.. but would rather have these beauties than the $50.00 to $75.00 grey riding gloves I eventually found at another retail store!

Now - lets see if I can find some crochet gloves that I can dye grey!!!
I will post pictures of the new suit Cindy is creating for me as soon as she is done with it. I can't wait!!!
Wednesday, May 27, 2009

Thursday, May 14, 2009
Now That You Have the Correct Size Saddle...
..this is how you strap it on!
 I seriously thought about making copies of these diagrams and hanging them up in my barn!

 I seriously thought about making copies of these diagrams and hanging them up in my barn!
Wednesday, May 13, 2009
Visual Sidesaddle Fitting Aid
A good fit.
This saddle is too long..or the horses back is too short!
Good Fit.
Too narrow.
Too wide.

This saddle is too long..or the horses back is too short!

Good Fit.

Too narrow.

Too wide.

Saturday, January 24, 2009

Wednesday, January 14, 2009
Sidesaddle Rider Exercises!
Look what my friend Pam sent me:
Unmounted Exercises
Hip and glut. stretch
Sit on a straight chair, feet flat on the floor. Cross right leg over the left leg. Rest the outside of your right calf on top of your left thigh. Grasp right ankle with left hand. GENTLY pull right ankle toward left hip. At the same time, press right knee downward toward floor. Keep stretch steady and smooth, do not bounce or pulse. Only stretch until you feel discomfort. Do not stretch until your discomfort turns to pain. Hold stretch for a slow count of 5. SLOWLY release right ankle, uncross legs and set right foot back on floor.
Lift right foot off floor and swing knee to the right as far as it will go comfortably. Pause. Swing leg back to starting point. Set foot back on the floor. Extend right leg straight in front of you and hold for a count of 3. Repeat this stretch and release 5 or 6 times, once or twice a day.
2. Knee and ankle strength and stretch
Standing up straight, lift left foot off floor however is most comfortable for you. Bend right leg at the knee, SLOWLY lower yourself as far as you can without lifting right heel off of floor. DO NOT BOUNCE. Hold for a slow count of 5. SLOWLY rise up until leg is again straight.
Now stand on left foot and raise right foot off floor. SLOWLY bend and straighten your right knee several times. DO NOT KICK. Next rotate right ankle in a circular motion, first one way then the other. Return foot to floor. Repeat this stretch and release 5 or 6 times, once or twice a day.
Thigh strengthener
Standing up straight, SLOWLY lift right leg ahead of you as high as you are able. Hold leg extended for a slow count of 5. Be sure to concentrate on using your thigh to hold up leg, not your back. SLOWLY lower leg, then bend and straighten knee several times. DO NOT KICK. Repeat this exercise 5 or 6 times, once or twice a day.
Calf stretch
On a step or stair, stand on balls of feet with heels extending over edge.
SLOWLY lower your heels until you feel discomfort. DO NOT BOUNCE. Hold for a slow count of 5. Rise back up to level. Pause. SLOWLY rise up to tip toe. Hold for slow count of 5. SLOWLY lower heels down past level until you feel discomfort. Hold for slow count of 5. Step down. Repeat this stretch and release 5 or 6 times, once or twice a day.
Foot coordination
Sitting in a chair, hands on each side of hips to support weight. Raise feet slightly off of floor and ahead of you. Point right toes down and left toes up. Return feet to being even with each other. Repeat rapidly 15 times once or twice a day. Note this is a coordination exercise, not a stretching exercise. Do not strain ankles. It is important to have feet completely off of floor. Do not rest heels on floor. DO NOT increase repetitions of this exercise as it will put undo strain on your lower back.
6. Thigh balance
Sit on corner edge of table or desk on right thigh and seat. Hang right lower leg and foot over table or desk edge in front of you. Support your weight with left foot on floor. Shift weight to right thigh while raising left foot off floor. Concentrate on weight being centered on thigh rather than seat. Sit up straight, do not lean forward or sideways. Hold for a slow count of twenty. This is a balance exercise, there should be no straining. If you feel as though you need to lean far to the right to lift foot off floor, scoot your seat over to the right about an inch. Try again. Continue to scoot over an inch at a time until you are just barely balancing on edge of the table. Hold balance for a slow count of 20. If you start to teeter hold for a shorter count and work your way up to 20.
Mounted Exercises
Foot coordination
While warming up your horse at the walk with feet in stirrups, raise right heel up and drop left heel down. Remain evenly balanced in saddle. Try doing this quickly. Right heel up, at the same time, left down. Some riders are able to do this easily. Others have a hard time having their feet go in different directions.
When you are ready to move into the trot, again raise right heal and drop the left heel. Ease into a sitting trot using your seat for balance, not the stirrups. Only rest feet lightly in stirrups. Then try doing it quickly as you
did at the walk. I wouldn’t suggest posting this way, your horse may never forgive me.
The reason for this exercise is to be able to use light purchase while riding aside. You will occasionally need just a little more security than your balance alone. As you will learn in a future segment, purchase means to stabilize yourself in the sidesaddle. A light purchase is achieved by pointing your right toe down. What many riders do is also raise their left heel at the same time. This foot coordination exercise and the unmounted one (no. 5) helps to teach you to work your feet independently.
Balance exercise
Ride bareback! Balance yourself with your seat, not your horse’s mouth via the reins. Again, practice right toes down, left heel down. Keep ankles soft, don’t tighten legs. If you’re concerned your horse has too rough of a trot and/or canter, just walk. It will still do you a world of good.
Move back
If you do not ride saddleseat borrow a Lane Fox tree cutback saddle. It’s best to use a flat seat rather than the deeper equitation seat. Typically a flat seat will have a square cantle while an equitation seat will have a round cantle. Riding in a cutback will give you some of the sense of sitting farther back on the horse as you will be riding sidesaddle. You will also be able to practice riding with the longer reins required for sidesaddle. When sitting farther back you will have to have longer reins in order not to have your arms stretched out in front of you.
There are no built in “tricks” to hold you in place on a cutback. The flat seat is designed to allow the rider to shift forward or backward on the seat while executing the various gaits. Staying in one spot, which is what you are aiming for, can be a challenge. Built without knee blocks or deep seats as hunt or dressage saddles are, while riding these saddles it is completely up to the rider to maintain their balance.
Practice the correct saddleseat leg. Ride with feet pointing more forward than in hunt seat. DO NOT turn toes in, instead rotate heels out. This will engage your entire leg into the saddle from the calf all the way to the hip.
New Cues
Practice cueing your horse with only your left leg and your seat. This will give you and your horse a head start before the new saddle and riding position begin.
If your horse does not understand only one leg, use a sidesaddle cane to replace your right leg. Use your cane in the same position and with the same pressure as you would your leg. Some horses pick up weight shift cues, others rely on the cane, while some work better using both. Each horse is different. Experiment to see what works best for your horse. Combining the new cues with the cutback saddle and longer reins, along with the exercises you and your horse will be well on your way to riding aside.
Friday, January 9, 2009
How to Tie a Stock Tie..
Again, this is not something that would be in the standard costume of Saddleseat, but for any hunt sidesaddle riders, it is very good info!
...and what the finished product should look like!.jpg) Did you know that Stock Ties came to be out of necessity? Although very fashionable, they double as a valuable piece of first aid equipment - used as a tourniquet!
Did you know that Stock Ties came to be out of necessity? Although very fashionable, they double as a valuable piece of first aid equipment - used as a tourniquet!

...and what the finished product should look like!
.jpg) Did you know that Stock Ties came to be out of necessity? Although very fashionable, they double as a valuable piece of first aid equipment - used as a tourniquet!
Did you know that Stock Ties came to be out of necessity? Although very fashionable, they double as a valuable piece of first aid equipment - used as a tourniquet!
Thursday, January 8, 2009
The Correct Way to Wear a Sidesaddle Veil..
Even though I would not use a veil riding against Saddleseat riders, I thought this was very interesting ...and would be valuable for any of my hunt sidesaddle riding friends!
This is what it looks like on a real model.

This is what it looks like on a real model.

Wednesday, January 7, 2009
Look What SmartAlex Found!
It is a Sidesaddle book published on line!
Titled:
The Horsewoman, a Practical Guide to Sidesaddle Riding.
by: Mrs. Alice Hayes

http://books.google.com/books?id=jhNDAAAAIAAJ&printsec=frontcover&dq=side+saddle&as_brr=1#PPP1,M1
Thank you SmartAlex!
Titled:
The Horsewoman, a Practical Guide to Sidesaddle Riding.
by: Mrs. Alice Hayes
http://books.google.com/books?id=jhNDAAAAIAAJ&printsec=frontcover&dq=side+saddle&as_brr=1#PPP1,M1
Thank you SmartAlex!
Thursday, January 1, 2009
Taking a Withers Tracing
This is Chastain, a 16+ hh American Saddlebred Gelding. He is my rescued horse and the one I want to learn Side Saddle riding with. He has a soft back. Since he is flexed to the left, it looks worse in this photo...
..and since his mane is covering his high withers, it does not look so bad in this photo. In reality, it is somewhere in between.
This is Chastain's withers tracing. I had to use baling wire because - well that is all I had. I would have taken pictures of me doing this with the horse...but I was too busy convincing Chastain the wire was not the enemy and that I still loved him! Yes - I used some ugly Christmas wrapping paper to make the tracing because it was the only paper I had that was wide enough!
I thought Chastain was an extremely wide horse..but now I think I was wrong. Someone will have to help me here - but is 19 inches wide? It sure looks narrow to me.
I knew Chastain had a very pronounced wither, but maybe it was either his general size or the soft back that made me think he was so wide. A pronounced wither seems to be a good thing for getting a better fit with a sidesaddle.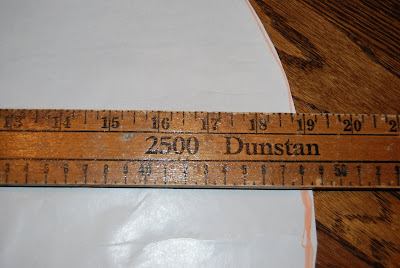 The reason I took the tracing after I bought the saddle is to have something to send to a sidesaddle broker if the one I bought will not work. Many American Saddlebreds are very fine boned and narrow. I actually have a 4 year old built this way...but he is way to young to learn the sidesaddle now. The saddle I bought is also so overstuffed that maybe it would work - if that problem was worked on...but if not - I will be on the search again.

..and since his mane is covering his high withers, it does not look so bad in this photo. In reality, it is somewhere in between.

This is Chastain's withers tracing. I had to use baling wire because - well that is all I had. I would have taken pictures of me doing this with the horse...but I was too busy convincing Chastain the wire was not the enemy and that I still loved him! Yes - I used some ugly Christmas wrapping paper to make the tracing because it was the only paper I had that was wide enough!

I thought Chastain was an extremely wide horse..but now I think I was wrong. Someone will have to help me here - but is 19 inches wide? It sure looks narrow to me.

I knew Chastain had a very pronounced wither, but maybe it was either his general size or the soft back that made me think he was so wide. A pronounced wither seems to be a good thing for getting a better fit with a sidesaddle.
 The reason I took the tracing after I bought the saddle is to have something to send to a sidesaddle broker if the one I bought will not work. Many American Saddlebreds are very fine boned and narrow. I actually have a 4 year old built this way...but he is way to young to learn the sidesaddle now. The saddle I bought is also so overstuffed that maybe it would work - if that problem was worked on...but if not - I will be on the search again.
Wednesday, December 31, 2008
New Things I have learned
This is information given to me by different sidesaddle riders. Please chime it if you have anything to add!
1. Sidesaddles are girthed up on the off side.
2. A Royal Warrant is a possible mark on the saddle with "By Appointment to [insert name of member of royal family here]". A company or individual who has provided goods or services to a "royal" that way can apply for the Warrant, which is good for a certain number of years and can then be renewed. It's great advertising, and of course still used--look in any Barbour coat! Anyway, if a saddle does have one, depending on whose name is given as the granter of the Warrant, it helps determine the earliest and latest years when a saddle could have been made.
3. The Impakt saddle pad is made out of some kind of foam. It feels weird, almost sticky. When it heats up from the horse's back it adheres to the back and also the saddle. I should say it adheres to a leather saddle, it wouldn't do the same with linen. After a ride I would carefully peel the saddle off the pad, then the pad off of the horse. The pad was always wet, but Marcel's back was always dry. It held the saddle where I put it without having to tighten the girth as much as you normally would with a sidesaddle. It did well with his wedges too. The felt has a bit of grip to it to hold the saddle and they never budged off the pad.
4. "A Queen" is a foam cushioning covered in sheepskin (can be faux) on one side to pad the fixed head. Extra wide elastic, 2" - 3" is used on the other side.
5. I have also learned how you girth up your sidesaddle TOTALLY depends on what kind and even what brand of sidesaddle you own. There are as many answers to this question as there are saddles! Uggghhhhhh!
1. Sidesaddles are girthed up on the off side.
2. A Royal Warrant is a possible mark on the saddle with "By Appointment to [insert name of member of royal family here]". A company or individual who has provided goods or services to a "royal" that way can apply for the Warrant, which is good for a certain number of years and can then be renewed. It's great advertising, and of course still used--look in any Barbour coat! Anyway, if a saddle does have one, depending on whose name is given as the granter of the Warrant, it helps determine the earliest and latest years when a saddle could have been made.
3. The Impakt saddle pad is made out of some kind of foam. It feels weird, almost sticky. When it heats up from the horse's back it adheres to the back and also the saddle. I should say it adheres to a leather saddle, it wouldn't do the same with linen. After a ride I would carefully peel the saddle off the pad, then the pad off of the horse. The pad was always wet, but Marcel's back was always dry. It held the saddle where I put it without having to tighten the girth as much as you normally would with a sidesaddle. It did well with his wedges too. The felt has a bit of grip to it to hold the saddle and they never budged off the pad.

4. "A Queen" is a foam cushioning covered in sheepskin (can be faux) on one side to pad the fixed head. Extra wide elastic, 2" - 3" is used on the other side.
5. I have also learned how you girth up your sidesaddle TOTALLY depends on what kind and even what brand of sidesaddle you own. There are as many answers to this question as there are saddles! Uggghhhhhh!
Friday, December 19, 2008
What are all These Straps for?
Okay - ignore the cute little sandwich case on the offside of the saddle! The large strap going under the saddle is the main girth, acting as all main girths do on every type of saddle.
The smaller strap is called a balance girth and does just what it says. It helps to balance the back on the saddle and keep it from slipping and-or turning.

The smaller strap is called a balance girth and does just what it says. It helps to balance the back on the saddle and keep it from slipping and-or turning.

Subscribe to:
Posts (Atom)
